
(Please excuse the crappy picture)
Now all I need is a shop the size of my house, about twelve more routers, a big honkin' lathe and a 93" thickness sander. Oh, and let us not forget the pocket hole machine and fortyleven more clamps...all in due time, I suppose...but I digress.
See, back in June, Amy gave me a gift certificate from Woodcraft as an anniversary gift (yes, she is the greatest!). Believe it or not, I couldn't decide on what to get, so, rather unlike me, I waited until I made up my mind.
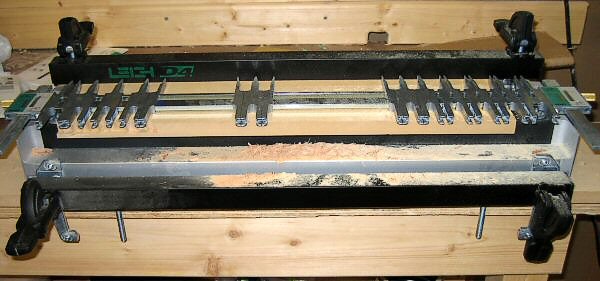
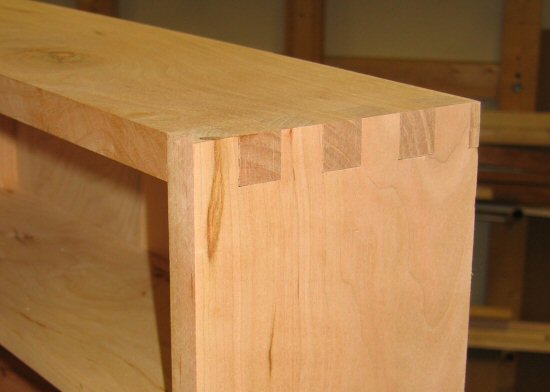
Last week, I got an e-mail out of the blue from somebody who wanted to buy one of my old domain names. I wasn't using it anymore, so I figured "what the hell." I took his money and the gift certificate Amy had purchased me and headed to Woodcraft (where else?). After all, one of the upcoming projects on my list is a blanket chest for Amy and what better joinery for a blanket chest then some nice through dovetails?
After watching the instructional video that comes with the jig and reading the manual (and yes, you do have to read the manual for this thing...there are a lot of fiddly parts to get set up!) I managed to ruin some perfectly good pieces of plywood in trying to test the setup of the jig. But I did get it set up, and after some playing with scrap, I decided to take a shot with some "project" wood.

No, they're not perfect, but they're pretty decent for my first day with the jig. I definitely see the point in scribing a line across the workpiece and using a piece of scrap behind the piece being routed.
I do have to hand it to the people at Leigh. They not only put together one helluva jig, but they do an incredible job of documenting every little step both in putting the jig together (down to a list of things you will have left over when you're done with assembly) and how to actually use the jig itself. They even provide a video showing the jig in action and, as a teaser, show you all the other cool accessories you can get for it. It's a stout piece of equipment, well built and obviously built to high tolerances. If I can make dovetails a few hours after opening the box, just about anyone would be able to as well. My Christmas list will definitely be including some of the accessories for this jig :)
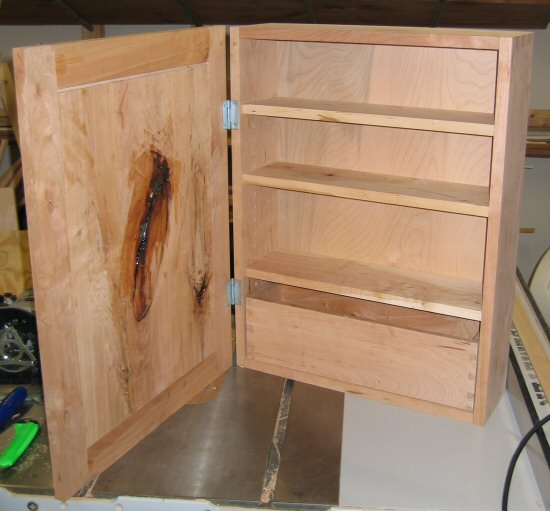
Big doin's here at the shop today. For a long time I've been wanting to build a cabinet to store my router bits in. I had built what you might loosely call a cabinet for them a long time ago, but it was extremely crappily contructed, was entirely too small, and just plain annoyed me when I looked at it. On top of all that, I only had made provisions for 1/4" bits, which was fine back in the day when all I had was a router capable of handling 1/4" bits, but as time has gone on and my router bit collection has grown with my collection of routers, my bits have either stayed in the cases I bought them in or been placed haphazardly in the cabinet under the router table. Not exactly the best way to keep up with things to say the least.
Needless to say, a new router bit cabinet was needed.
I decided to take things a step further on this project, however. I decided to try a bunch of things I had never tried before. For one, I decided that I would construct the sides of the cabinet using box joints, using a table saw box joint jig that I built myself. I also decided to try to do a raised panel door. Lastly, I decided that I would no longer be intimidated by hinges :)
Here's how it turned out...granted, it still needs sanding and finishing, but being impatient, I wanted to take pictures to post.
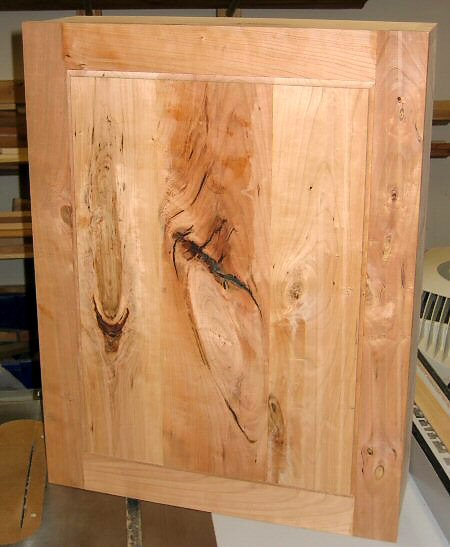
Now you may be wondering what's up with the big knots on the door and the goop on the back. Well, I saw David Marks (of Wood Works fame) taking knot-ridden wood that would have otherwise been fodder for the wood smoker and using epoxy to fill in the knots and using the knots to add character to the piece. Well, I happened to have several boards that have been sitting in the wood rack for a while and I decided to throw in an extra twist by trying to replicate his technique. It actually worked out fairly well with the exception of running out of epoxy. The knot in the center of the door was rather large and took quite a bit of epoxy to fill in. It should be interesting to see what the door looks like when I get some finish on it.
I put the door itself together with mortise and tenon joinery, which worked out pretty well. The raised panel isn't as raised as I wanted it to be, but the mini-panel raising bits I have will only do so much. At least I'll have room in the cabinet for a set of real panel-raisers.
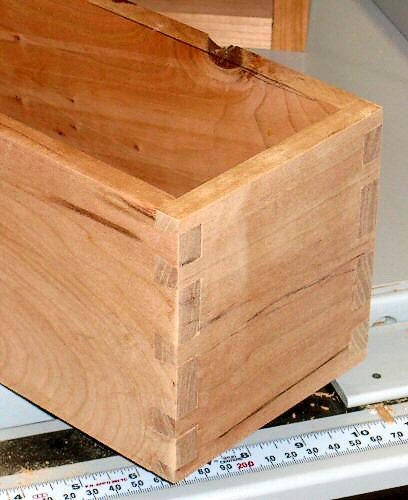
The shelves have not had holes drilled for the bits yet. I need to figure out how I'm going to arrange them. The box shown in the bottom of the cabinet will hold miscellaneous pieces-parts like wrenches, collets and bushings. And yes, it is put together with dovetails...but you'll have to wait for the next post for details on that :)
I have to divulge a secret...I actually did some other small projects while I was working on the crib. You know how it goes; you're working on a large project and then you see all of these other little things that you want to do. At least if you are like me, you won't let yourself build the other little things until you finish the big thing you're working on.
Over the past weekend, before I finished the crib, I decided I had to get a couple of small things out of my system. Turned out to be just the ticket, though, as once I finished my little recycling projects, finishing the crib off was actually enjoyable.
So anyway, my bro-in-law had given me a stack of small plywood scraps he had collected while installing dishwashers...he tells me they use plywood to keep the cardboard more rigid. So I got a wild hair and decided to build some shop "furniture" with it. Figured that would be the best use for it as none of the plywood was similar in color and all of it had staple holes.
First up was the "sander shelf". No, again, this isn't an original idea (are you seeing a trend?). I saw a plan for something similar in one of the wood porn magazines and altered it just a little.
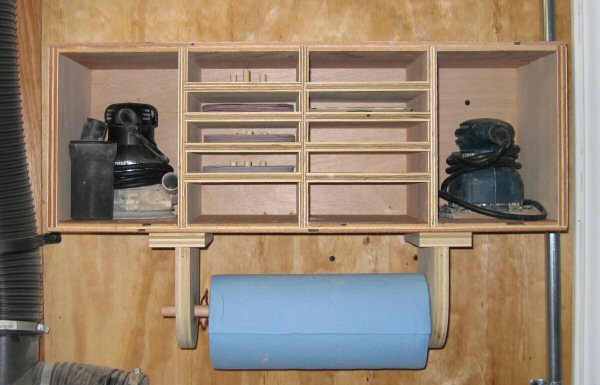
As you can see, it's not quite fully stocked yet. Basically, the idea each grit of the hook-and-loop paper discs for my random-orbit sander gets its own shelf. The discs are placed onto the dowels, which lines them all up. Plop the sander onto the discs, lining up the holes on the sander pad and you're good to go. The little cubbies on the right will someday hold 1/4 sheets of sandpaper for my finish sander...just as soon as I cut the full sheets up. The paper towel holder was added more as an afterthought, but at least it will keep some paper towels handy and more importantly, in one place.
Next was a blade rack. As time has moved along, I've started to accumulate saw blades. Some nice ones, some downright crappy ones. I had them all hanging on the pegboard next to the table saw, but after a while that got to be a pain as I had to move one blade to get to another and I was always afraid one of them was going to take a Newtonian plunge to the floor. Again, this isn't at all an original idea...I actually got the idea for this from one of the guys that used to frequent the Amateur Termite forums...now long dormant.
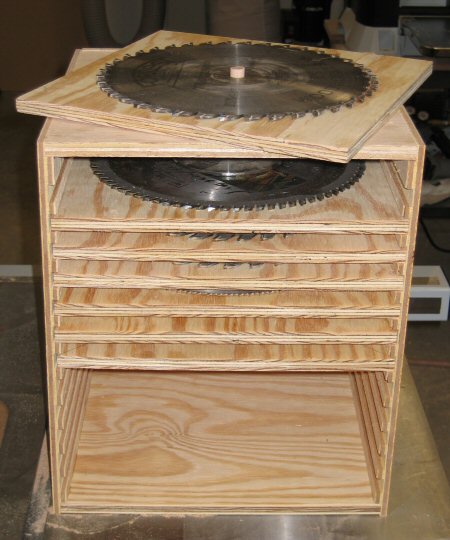
The basic idea here is to keep the blades from banging around inside. To do that I put a piece of 1/2" dowel in the center of each shelf, which does a decent job of keeping everything in its place. The shelves slide into 1/2" dadoes in the plywood sides. I need to make a couple more shelves, but to be honest, I ran out of plywood. Besides, I don't have enough blades to fill it up yet anyway. The nice thing about it is that I can sit it on the floor underneath the table saw, using some otherwise wasted space, and now have more pegboard to clutter up.
Last little project is going to be a router bit cabinet as I get tired of digging in the sawdust inside the router table cabinet looking for bits. Then I believe I'll be over the little things that have been bugging me and will be moving on to the next big project. Perhaps I'll even come up with a psuedo-original design for something.
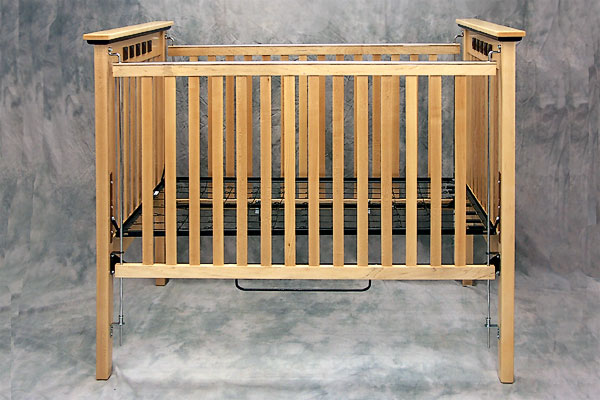
After six long months of procrastination...err...hard work and perseverence, I am quite happy to say, the crib is done.
Enough blabber, have a look at the pictures...here's one to get you hooked.
A close up of the inlaid walnut...
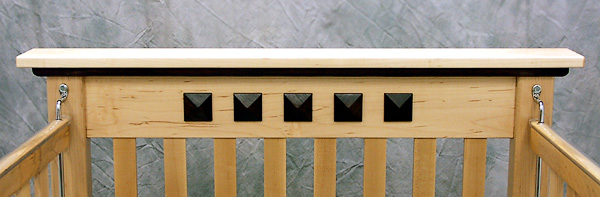
A view from the front, looking through to the back...
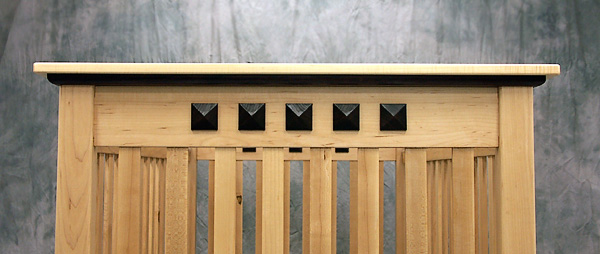
And finally, a look at the entire crib from the front...

All in all, this was a very rewarding project to build. Looking at it I find it rather hard to believe that this is something that I built with my own hands...and I find it even harder to believe that it actually went together and functions as it should! The trickiest part of the entire project was the finishing. There are a lot of little nooks and crannies to try to get finish into...and to get finish in there without messing up other parts of the finish was at times rather frustrating. But I learned a lot along the way, both in the construction and in the finishing...sometimes the hard way :)
The crib is finished with two coats of gloss Arm-R-Seal followed by two coats of semi-gloss Arm-R-Seal. I went through a quart of finish (a pint of gloss and a pint of semi-gloss), countless recycled t-shirts, a bejillion latex gloves, and a couple dozen foam brushes in the process.
I hope, for Mike and Christy's sake, that Kaitlin Ann gets many quality hours of sleep in the crib. Who knows, maybe a new nephew would enjoy it too? :)
I just have to send a big old "Thank You" to the guys at the Woodcraft in Alpharetta. Granted, they've always been very friendly (not to mention patient), but today they helped me past the final (hopefully!) hurdle in my quest to finish the crib.
See, I had been having some major technical issues inserting the threaded inserts that hold up the gates and such. Ugly technical issues. I built a jig, tried waxing the inserts, but just couldn't get them to "insert" without splitting the top 1/32" of the maple. Having practiced inserting a couple more inserts than I should have (you know what they say, "Insanity is doing the same thing over and over, expecting a different outcome.") I paid a visit to the guys at Woodcraft to pick up some more.
While checking out, I asked the guys behind the counter for some friendly advice on how in the hell to get these #@%! things in without tearing up the crib. Granted, their answer was rather obvious, but being rather new to this, I wanted to hear it from someone else before I tried it. Basically, they suggested I make the holes just slightly bigger. Granted, they should have ended the conversation with "Here's your sign," but these guys have never been anything less then friendly, even during the great Jorgensen Clamp Rush of '03.
So, this evening, with my shiny new drill bits (which were about $5 a shot cheaper then they were at Lowe's, BTW) I experimented some more. Alas, no splitting! The rest of the inserts went in without incident. Hopefully with the inserts inserted, construction will end this weekend and I can get some final pictures up...hopefully :)